@durdn from Atlassian wrote an excellent tutorial on how to manage dotfiles using a bare Git repository . Your dotfile setup will be ship-shape within minutes!
Yet, it took me hours to demystify the tutorial. It uses a bare repository in a novel way, by configuring $HOME as the work tree.[1]
The secret sauce is the work tree configuration, not the bare repository. I discovered that using a non-bare repository is functionally identical. This post will meticulously explain the setup, and provide a non-bare repo alternative.
Overview of storing dotfiles in a Git repository
- Set a Git repository’s work tree to
$HOME
git add and commit your dotfiles to the Git repository. The dotfiles remain at their original paths.- Push your Git repository to a remote server such as GitHub. Now your dotfiles are backed up, and can be replicated.
Replicate your dotfiles by cloning down the repo, configuring it, and checking out the files. The files are checked out at their original paths relative to $HOME.
You get all the benefits of version control, are freed of the burden of maintaining symlinks, and can toss out complicated tools. Genius!
Here’s the setup all together for reference, followed by a line by line breakdown.
Note that the only two differences between using a bare and non-bare repository are:
Now for the line by line breakdown. But first . . .
Prerequisite knowledge
Two concepts should be crystal clear: the Git repository and the work tree. Skip ahead if you’re already comfortable with these.
I like this definition of repository aka repo :
“Strictly speaking, a Git repository includes those objects that describe the state of the repository. These objects may exist in any directory, but typically exist in the .git directory in the top-level directory of the workspace”
“State of the repository” includes information like names of all the existing branches, the commit history on those branches, and the git log, i.e everything that Git needs for version control.
The work tree (aka working tree, working directory) does not store any information about the state of the repository. The work tree is a representation of the actual files tracked by the repository. These files are pulled out of the compressed database in the Git directory and placed on disk for you to use or modify.
A work tree is not part of the repository, and a repository doesn’t require a work tree. I find it helpful to think of the work tree as a feature of a repository.
The actual project files you get when you clone a repository are a working copy created by checking out a ref (a branch or tag or commit) – usually main or master.
If the repository and work tree are still vague concepts for you, I encourage you to do further research. Getting a solid understanding of these is essential for following the rest of this post.
Line by line breakdown
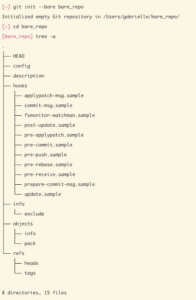
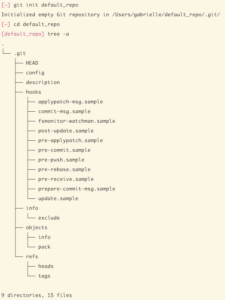
1. git init --bare $HOME/.cfg
Line 1 creates the folder .cfg, a bare Git repository which will be used to track our dotfiles. Repositories come in two flavours, non-bare (the default) and bare. Here’s a summary of key differences:
Differences between bare and non-bare repositories
| Repository type |
Initialisation |
Initialised with a work tree? |
Location of Git files |
| Non-bare |
git init – (it’s the default) |
Yes, at the top level of the project directory |
In a .git folder inside the project directory
/.git |
| bare |
git init –bare |
no |
At the top level of the project directory |
Here’s their respective tree structures:
2. alias config='/usr/bin/git --git-dir=$HOME/.cfg/ --work-tree=$HOME'
Normally, you run Git commands inside a project folder. Git commands are processed in the project’s /.git directory , and Git assumes that the working tree is located at <project>. None of this has to be configured, it’s the default behaviour of a non-bare repository.
Line 2 creates an alias named config which allows you to send git commands to the .cfg repository from any location, even outside of the repository.
It also configures the initially bare .cfg repository to set $HOME as the work tree, and store the Git state at .cfg
3. echo "alias config='/usr/bin/git --git-dir=$HOME/.cfg/ --work-tree=$HOME'" >> $HOME/.zsh/aliases
Makes the config alias permanently available, so that you don’t have to run line 2 every time you start a new shell session. You can either manually paste this alias or use line 3 for convenience, replacing .zsh/aliases with your chosen alias file.
If you use the zsh setup, your .zshrc file must load in the alias file with source $HOME/.zsh/aliases.
There are many ways to set up permanent aliases, e.g by adding then to your ~/.bashrc.
4. config config --local status.showUntrackedFiles no
Before running line 4, try typing config status, from any directory.
Our config alias is sending a Git command to the .cfg Git directory. The status will show a long list of all the untracked files under our work tree $HOME .
But .cfg should only keep track of the dotfiles that we explicitly add, not every single item on our computer. So, Line 4 sets a local configuration in .cfg to ignore untracked files.
After running line 4, run config status again, and you’ll get the message On branch master nothing to commit
5. Add, commit and push to the remote
Now you can add and commit dotfiles from any directory. Use your config alias combined with Git commands, like so:
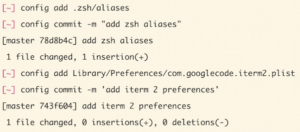
Set up a remote repository on GitHub or your Git server of choice, and push as normal
config remote add origin <remote-url>
config push -u origin master
Install your dotfiles on a new system, or migrate to this setup
1. echo ".cfg" >> .gitignore
There could be weird behaviour if .cfg tries to track itself. Avoid recursive issues by adding .cfg to your global Git ignore.
2. git clone <remote-git-repo-url> $HOME/.cfg
Add a --bare flag if you wish you use a bare repo
3. alias config='/usr/bin/git --git-dir=<path to .cfg’s Git directory> --work-tree=$HOME'
Set up an alias to send Git commands to .cfg, and also set $HOME as the work tree, while storing the Git state at .cfg
For a bare repo, the path to the Git directory is at the top level of the project: $HOME/.cfg/
For a non-bare default repo, the path to the Git directory is inside a .git subdirectory: $HOME/.cfg/.git
4. config config --local status.showUntrackedFiles no
Set a local configuration in .cfg to ignore untracked files.
5. config checkout
Checkout the actual content from your .cfg repository to $HOME. Git pulls the tracked files out of the compressed database in the Git directory and places them in the work tree.
E.g if you added $HOME/.zsh/aliases to .cfg, that file will be instantiated at that path on your new computer. Ta Da!
config checkout might fail with a message like:

Files on your computer might have identical locations and names to files in the .cfg repo. Git doesn’t want to overwrite your local files.
Back up the files if they’re useful, delete them if they aren’t.
Run config checkout again until you don’t get any errors.
Your dotfile setup is complete!
Treat your dotfile management system is like any other Git project. Just use the config alias to add, commit, push and pull.
Wrapping Up
Git is an easy, robust solution for dotfile management. Setting the worktree to $HOME is a brilliant idea.
I hope that this post deepens your understanding of Git, and saves someone going down a rabbit hole of researching bare repos!
Many thanks to @durdn for sharing this technique, his tutorial is the basis of this post.
Footnotes